Monday, November 28, 2011

Christmas Yarn-Wrapped Wreath


I decided to try my hand at one of those adorable yarn wrapped wreaths that have been popping up all over Pinterest and crafting blogs. For Christmas this year, I felt like going back to the good 'ol traditional green and red. Last year, I did my wreath and tree in purple and gold! It was really pretty, but honestly.. it looked like a pimp had decorated my house. (we called it the "pimp tree") This year... I'm getting back to the basics. 

For this project I used:
*a plain green styrofoam wreath (after reading tons of blog posts, I think a plastic wrapped straw wreath would actually work better, the styrofoam ones crumble easily)
*yarn
*felt
*ribbon
*hot glue gun

First, I wrapped the entire wreath with yarn. I started by tying a knot in the yarn, pinning it to the back of the wreath to hold it in place, and then began wrapping:


Don't worry about trying to keep it perfect, it will take forever! Just completely wrap the entire wreath 2-3 times or until the wreath is completely concealed with yarn.


Next, I added some felt flowers. You can click here: http://blissfulbirdie.blogspot.com/2011/09/felt-flower-wreath-for-fall.html  for instructions on making felt flowers. They are super easy.


Once I hot glued the felt flowers on, I decided it needed a little something else. So I wrapped the rest of the wreath with red ribbon. Starting by glueing one end to the back of the wreath, wrapping it around, and then glueing the other end to the back as well. Looking back, I should have wrapped the entire wreath with ribbon first, then glued the flowers on. But it still turned out pretty cute, I think. 


That's it! Here is the finished product below. The whole process only took about 2 hours! ENJOY!


Wednesday, November 16, 2011

DIY Apothecary Jars

This is an adorable, easy DIY project with endless possibilities. AND it only cost me about $6 to make. Of course, I saw this on Pinterest and had to try it right away! I went to the dollar store and grabbed a few glass candlesticks and various shaped glass jars. (ex. a few medium sized glass candle holders and an actual drinking glass!)  I used E6000 glue and some Ivory matte spray paint


First, I spray painted the glass candlesticks. This is optional and you can do any color you want. (I did a few coats, letting them dry in between each)


Once the paint was dry, I simply used my E6000 glue and coated the rim of the top of the candlestick and set the glass jar on top, aligning it so that is was centered. 


Once the glue is dried. You are done!! You can put anything you want in them. Candy, corks, ribbon, Christmas ornaments. Use them in your bathroom and put your make-up brushes, Q-tips, etc inside. Again, the possibilities are endless. 


HAVE FUN!!!! 

Tuesday, November 1, 2011

NOVEMBER is HERE!

Hope everyone had a fun and safe Halloween. My little girl dressed up as a lady pirate and she was so stinkin' cute.


Well, let's just get to the point. There are two amazing things about November 2011. The first one is Thanksgiving of course, where we shall feast until our pants pop and spend much needed time with family.   (I will be posting some Thanksgiving recipes a little later). Another event that makes this month so special is... wait for it..... THE TWILIGHT SAGA - BREAKING DAWN Part 1.


For all of you other Twilight fanatics out there, I know it's been torture waiting almost a year and a half for this movie to come out! I mean we have some serious time and emotion invested into this series, and there's only so much waiting a girl can take. 

But alas, here we are, 17 days away. I'm as excited as I was when I saw New Kids On the Block for the first time back in March of 1991. (I must say, my maturity level may not have increased much, but my taste in music has definitely gotten better with age) :)


A few of the Theaters around town are doing Twilight Tuesdays (starting today) for the next 3 Tuesdays where you watch Twilight, New Moon, & Eclipse and be all caught up for the Nov 18th release of Breaking Dawn. But who are we fooling.. we own the DVDs and books and probably couldn't be any more caught up than we already are! 

Hope your November is off to a good start! 

Sunday, October 23, 2011

DIY Shabby Chic Vase - Upcycled

I've discovered another super easy and inexpensive project using items I would have otherwise tossed in the recycling bin. I love these little vases and this is something you can do with any type of container that will hold water.

You will need:

empty glass container (label peeled off)
matte or satin spray paint in white
optional: ribbon, jewels, (anything else you'd like to decorate the vase with)


For this project I used an empty greek pepper jar and a couple empty pickle jars that have been washed out and de-labled. I ran the labels under some very hot water for a few minutes to loosen the glue and they peeled off pretty easily.  I then spray painted the jars doing a few light coats, letting them dry between coats. You want to back away a little when you're spraying. If you're too close, the paint will go on too thick and will drip down the sides.


Once you have a nice, even paint job on your vases.. and they've dried, you can dress your vases up with anything you choose. I used some ribbon tied in a bow in the back. This way, with the changing seasons, I can simply change out my ribbon.


Couple of notes:
*you can also cut ribbon to fit, use some spray adhesive and wrap it around the jar
*Next I'm going to use some glass beer and soda bottles. I've seen this done in another blog post and they are so adorable. For now, I'm just using what I had on hand.
*these vases are really cute on a table or shelf, grouped together in you're using small jars. Odd numbers look best (3 or 5 vases)

Saturday, October 15, 2011

UPcycled Tin Can Vase

If you're like me, you have tons of empty tin cans around the house that have been de-labeled and washed out. I can't ever bring myself to throw them away because I know there are tons of super cute tin can craft projects out there.... like the one I tried tonight. Which by the way takes 10-15 minutes to make and it's so easy!

You'll need:
 a tin can, label peeled off and inside completely cleaned out. (mine came from a can of black beans)
ruler
scrap paper
spray adhesive
ribbon
(you can use buttons, rhinestones, etc..)


With your ruler, measure the height of the can. Then mark off your scrapbook paper and cut out your rectangle. I just eyeballed the diameter. You can always trim a little down, if once you wrap the paper around the can and find it's a little too long.


Once you have your paper cut out, spray a thin layer of the adhesive on the back, then carefully wrap the paper around the tin can, pressing it down gently. There isn't much room for error, because this spray adhesive gets super sticky.


At this point, you can really use anything your heart desires to finish decorating your vase. For this one, I chose ribbon. Just measure out ribbon, spray the back with the adhesive and carefully wrap around the can pressing down gently. 


To jazz it up a bit, I cut out a butterfly image from the left over piece of scrapbook paper, sprayed the back with adhesive and affixed it to the front of my face. Added a few fresh cut flowers from the garden and here is the finished product!

If you're going handmade this Christmas for your friends and family..  it doesn't get much cuter and inexpensive than this! Have fun!!

Monday, October 10, 2011

DIY Simple Wall Art

I wanted to share with you a quick and easy Wall Art project I just finished. I saw something on Pinterest.com that sparked my interest. It was from blog called Virginia and Charlie. You can go ahead and check out her super cute project here http://virginiaandcharlie.blogspot.com/2011/07/small-projects.html

Based on some comments on Pinterest, I decided to try a different version. You'll need just four things for this version:

Canvas (you pick the size)
Pencil
Elmers Glue (regular old Elmers glue in the squeeze bottle)
Acrylic Paint - color of your choice


Let's skip to the part where I show you my finished product :)


I liked the pattern used in the blog above, so I decided to stick with something similar. I used pencil on a blank white canvas and drew out my design. Then I used Elmers glue and traced my drawing. NOTE: a steady hand and evenly dispersed glue makes for a more seamless finished product. However, I really wasn't going for perfection here, just wanted a nice thick texture. I discovered that it's best to do two coats of glue. Once the first glue design dries, I would go back over it one more time. Once the glue dries, paint the entire piece. This may also take a few coats depending on your color choice. (side note: When I first made this, I used one coat of glue, let it dry, then painted. That's when I realized the texture wasn't thick enough for my liking, so I did the 2nd coat of glue, repainted and found I was much more satisfied with the results)

So here it is, up on the bathroom wall. Picture isn't great, but you get the idea :)


If you try this, I'd love to hear what you did and any variations you tried! Have fun!!

Thursday, October 6, 2011

FUN with WINE - Halloween edition

I love red wine. Typically on Thursdays, I have a girlfriend over and we watch (OK.. don't judge me) Vampire Diaries. It's a MUST to drink red wine on Thursday nights... but let's be honest... any night of the week is fine by me. 

I was at Michaels and found these really cute Halloween wine labels. Basically they are stickers and you simply stick them over the label on your wine bottle and VOILA! You have "Blood Brew". Or "Love Potion" 

I had three bottles handy, so I chose:
Blood Brew - Contents may have congealed during shipping
Truth Serum - Warning: May cause loose lips and free spirits (my fav!)
Wishing Tonic - Limit to 3 doses per day


Thought these would be really fun for a (adult) Halloween party! You could also make your own with large printer labels too! I checked out Michaels.com and found these Martha Stewart labels that look really cool (almost wish I had seen these first) ------>  You can also get them at Scrapbook.com


Sunday, October 2, 2011

Welcome to OCTOBER!

I'm so thrilled for October for a number of reasons. First of all, this is the first cool weather weekend we've had in Jacksonville and it's perfect for cookouts, days at the park, festivals and football! I'm also excited because it will be a month full of "firsts" for me! Last night was my first time tailgating at UF (for 6 hours!) before the Gator game and it was NUTS. I think there were more people down there than a day at Disney. We had a BLAST! well...except for the part about us getting our rear ends handed to us. That kinda sucked.

Next up on the list of "firsts" We are going to see DEATH CAB FOR CUTIE!! I've been listening to this band for a while now and I've never had a chance to catch them live! I'm so excited! I may I also mention that the lead singer, Ben Gibbard, is married to Zooey Deschanel.. who is equally talented, fantastic and beautiful. Anyway, their music and lyrics are truly phenomenal. I don't want to say they're geniuses, but.... 


One of my BFF's little girl is having her first birthday on the 15th! Very excited about that since this is her first child. It's fun to watch my friends enjoy parenthood for the first time. 

Finally we are closing the month out with ZAC BROWN BAND!! Now, I'm not a massive country music fan, but I do like some of it. My husband turned me on to this band last year and I'm hooked. Looking forward to checking them out in concert for the first time!


Also wanted to mentioned it's Breast Cancer Awareness month. This effects SO many women every day, every year. So ladies, please keep an eye on those Ta-tas regularly! Early detection can save your life! 


Friday, September 30, 2011

Felt Flower Wreath for Fall!

This post is inspired by the FALL weather we are finally getting this weekend here in North Florida! Perfect park, football, and festival weather! Ahhhh, I love it.

I saw an idea for a wreath like this on Pinterest.com and wanted to give it a try. I'll go ahead and show you my finished product:

All you need is:
Felt - your choice of color
1 Grapevine wreath
Hot glue gun

I found the tutorial for making the felt flowers over a great blog called Little Things Bring Smiles. Here's a sample picture and the link: http://www.littlethingsbringsmiles.com/2010/12/felt-fun.html

Simply put, I made up a slew of little felt flowers in various styles, and hot glued them to the wreath. I will tell you making all of these little flowers will take some time, but it's one of the EASIEST projects you'll ever try. This is a great project to do with your kids too. My daughter is 7, and she loved helping "roll" up the flowers.

Side note - I made some little hair clips with the left over flowers. Glued them to alligator clips, and then glued a little rhinestone in the middle. Took all of 1 minute and they are precious!

Wednesday, September 28, 2011

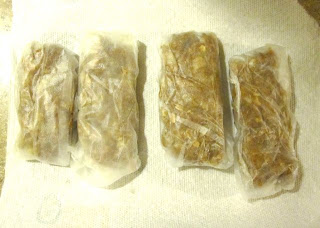
Freezer Peanut Butter Banana Granola Bars

This is such an easy, healthy snack. I actually got the recipe from a co-worker on a whim one day and didn't write it down. So when I got home, I just went with what I thought would work. :)  (PS. these pictures were taken at night, in my kitchen... quality is pretty poor)


Natural peanut butter (which has almost no sugar)
1 banana
3/4 - 1 cup your favorite granola mix
Press n Seal (for wrapping individuals bars)

Makes about 4 bars


Slice the banana, smash it up and mix it with the granola. Then add the peanut butter and stir it all together until well mixed. It will be chunky and sticky (of course)


Once combined, tear off a sheet of the press n seal and lay it flat. Scoop out a good sized portion of your granola mix and place it in the middle of your sheet. Using a spoon (I used my fingers a little and the sides of the press n seal) shape your mixture into a rectangular granola bar shape. 


Once you're satisfied with size and shape, simply wrap up the press n seal over the granola bar and pop them in the freezer

I typically make these before bed and they are ready in the morning. My 7 year old daughter loves these for breakfast. Much healthier than most breakfast cereals. I snag one for the car ride to work in the morning. Or for a mid afternoon snack. Great way to fix that sweet tooth too!

If you try this recipe, I'd love to hear any variations you make that may be tasty!

Tuesday, September 27, 2011

First Blog Post EVER!

Well, this is it. The day I decided to blog. My hopes are to share with you my crafting adventures, favorite recipes, and most likely..  random musings on life, love, and fun.  I'm a mommy, wife, part time event planner and part time jewelry maker. I'm in the process of revamping (vamp.. love that word) my Etsy shop. You can check it out here. http://www.etsy.com/shop/BlissfulBirdDesigns?ref=si_shop  I'm also one of those grown women who love the Twilight Saga. This is highly unimportant information, however, I do know for a fact that 87% of the women who blog are also massive teen Supernatural romance junkies :) 


Ok TTFN and I'll be back shortly with a super cute Fall project I just completed :)


Peace!